How to use the Form Wizard?

The form wizard can help you create new web forms in a matter of minutes. In a few simple steps you can create a completely working form to collect information from your visitors.
To launch the Form Wizard click Menu->Insert->Form->Form Wizard and draw a box on the page to indicate where the form will be inserted.
Step 1
In the first step you can select how you want to create your form.
Select the first option 'Create a new form based on a template' and click the 'Next' button.

Step 2
A list of predefined forms will be displayed, for this example we select 'Comments' and click Next.
A list of predefined forms will be displayed, for this example we select 'Comments' and click Next.

Step 3
In step 3 you can insert additional form fields to the predefined form.
Click the Add-button to display a list of available form controls. Select 'Editbox'.
In the window 'Set control label' you can specify the label that will be display in from of the editbox.
Enter 'Name:' and click OK
The new control will be added to the bottom of the list. Select the new item and click 'Move Up' 2 times, to make the input field appear above the submit and reset buttons.

Step 4
The fourth step determines where the form data will be sent to.
The fourth step determines where the form data will be sent to.
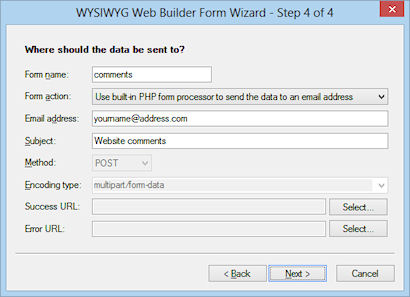
The Form name variable specifies the name of the form, you can leave this the way it is.
The Form action is the most important property of the form, it specifies how the data will be processed.
The option 'Submit data to an email address' will use the default email client of the user's computer to send the form data and although this seems like a valid choice, it is in reality an unreliable option! This option strongly depends on the configuration of the browser. We do not recommend using this option unless you are sure all the users of the form have setup their browsers/mail correctly.
A more reliable option is to implement a form processor in PHP (see also this tutorial), in that case you select 'Submit data to a page within your website'. However we've learned that users find it difficult to implement their own form processor so in WYSIWYG Web Builder 5.5 we've introduced a new feature: 'Use built-in PHP form processor'. If your website supports PHP then this will be by far the easiest way to process the submitted data.
Features of the built-in form processor:
1) The form processing script will automatically be integrated in the current page. No coding required!
2) Will send an email message with the submitted data to the specified email address
3) You can specify a 'thank you' page and error page.
4) File Uploads will be sent as attachments.
5) Validates submitted email addresses and checks for 'injected code'.
To enable the built-in PHP form processor for this form, select 'Use built-in PHP form processor to send data to an email address' in the Form action field.
Enter the email address where the results should be sent to. In the subject field you can specified the subject of the email message.
Success page: The page that the user will be redirected to after the data has been submitted (after the 'submit' button has been pressed).
Error page: The page that the user will be redirected to if an error occurred while processing the data.
To finish the Form Wizard click Next and then Finish. The form will now be added to the current page.
You can completely customize the form after it has been created. The Form Wizard just sets up the initial form, but you can add, edit, move elements just like other with objects. If you want to add new items just make the form larger and drag the new item on the form.
Create a responsive form using layout grids
By default, the Form Wizard will create a form layout with an absolute/fixed layout.
When this option is enabled, the Form Wizard will create a flexible/responsive form using layout grids. The option will automatically be selected if the page already contains layout grids.
When this option is enabled, the Form Wizard will create a flexible/responsive form using layout grids. The option will automatically be selected if the page already contains layout grids.

Set the file extension of the page to PHP!
It's important (!) to change the File Extension of the page to 'php' otherwise the server will not understand that your page contains PHP code. You can change the file extension of a page in Page Properties.
Also note that to test your form, it must be published to a web server with PHP installed.
Previewing the page locally in a browser will not work and will probably display the php code instead.
Also note that to test your form, it must be published to a web server with PHP installed.
Previewing the page locally in a browser will not work and will probably display the php code instead.
Additional information
If the form contains an editbox named 'email' (you can se tthe name of the field in the edit box's properties), then this email address will be used as the 'from' address for the message. This field name is case sensitive! So do not call it Email or eMail.
If the form contains one or more 'file upload' objects then the script will automatically attached these files to the email message.
Your hosting account must support PHP and the mail() function must be enable otherwise the described form will not work.
If the form contains one or more 'file upload' objects then the script will automatically attached these files to the email message.
Your hosting account must support PHP and the mail() function must be enable otherwise the described form will not work.