The Ultimate Toolbox for creating
amazing web sites!
Adding a lightbox gallery to your website
A lightbox gallery is a great way to display images on your website. It's a popup, modal, or overlay that shows your images or media files on top of the web page. Most of them focus on the image and darken out the rest of the page. WYSIWYG Web Builder has built-in support for many third party lightbox scripts: fancyBox, magnificpopup, galleria, prettyPhoto, slimbox, SwipeBox, Tos "R"Us, VenoBox, LC Lightbox, Strip and many more!

You can download additional lightbox add-ons here:
https://www.wysiwygwebbuilder.com/free_extras.html
The lightboxes add-ons should be installed in the Program Files folder.
Make sure you install select the folder where you have install WYSIWYG Web Builder, for example:
C:\Program Files\WYSIWYG Web Builder 16\lightbox\<lightboxname>
Lightbox galleries can be used in combination with the Photo Gallery or the Slide Show, which both can be found in the toolbox.
The Photo Gallery will display thumbnails of all images while the SlideShow will initially display only one image so the user will have to click it to see the other images. It is also possible to use lightboxes to open links and YouTube, Vimeo, HTML5 videos.
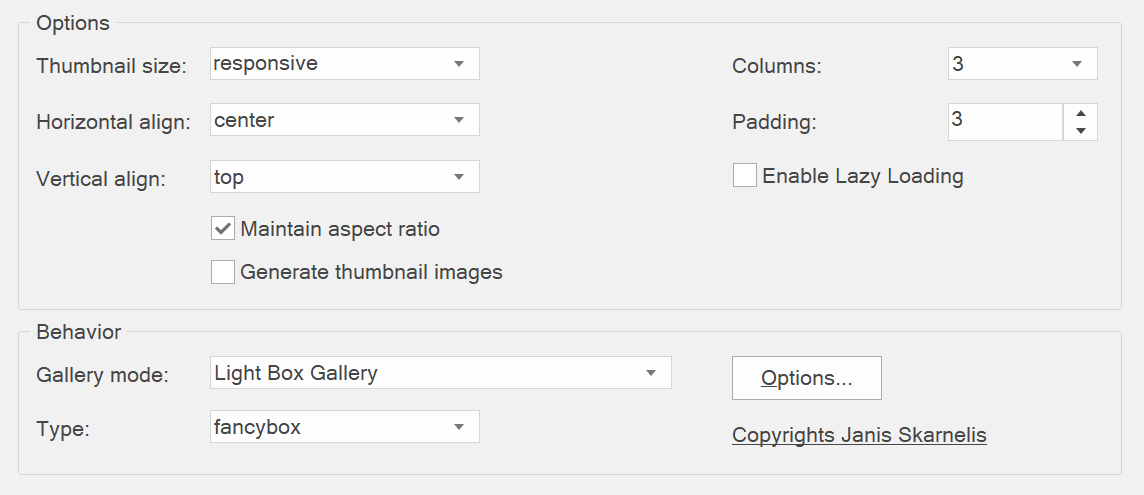
Photo Gallery
To select a lightbox in the Photo Gallery, open the properties and set the Gallery Mode to 'lightbox gallery'.
Now you can select one of the available lightbox scripts.
To select a lightbox in the Photo Gallery, open the properties and set the Gallery Mode to 'lightbox gallery'.
Now you can select one of the available lightbox scripts.
Slide Show
To select a lightbox in the Slide Show, open the object's properties and set the Type to 'lightbox gallery'.
To select a lightbox in the Slide Show, open the object's properties and set the Type to 'lightbox gallery'.

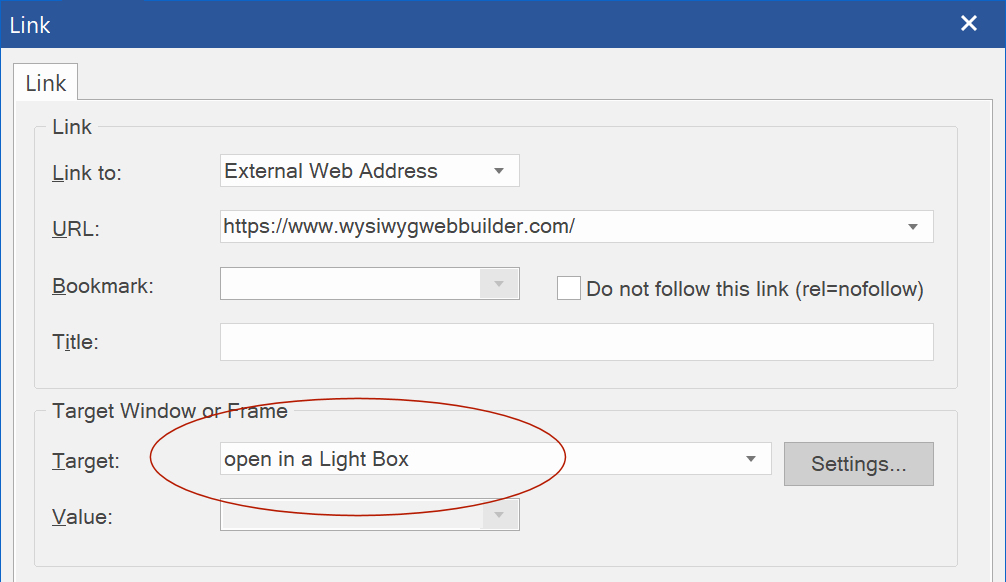
Links
Links can also be opened in a lightbox. For example, to display another page in a popup.
Links can also be opened in a lightbox. For example, to display another page in a popup.
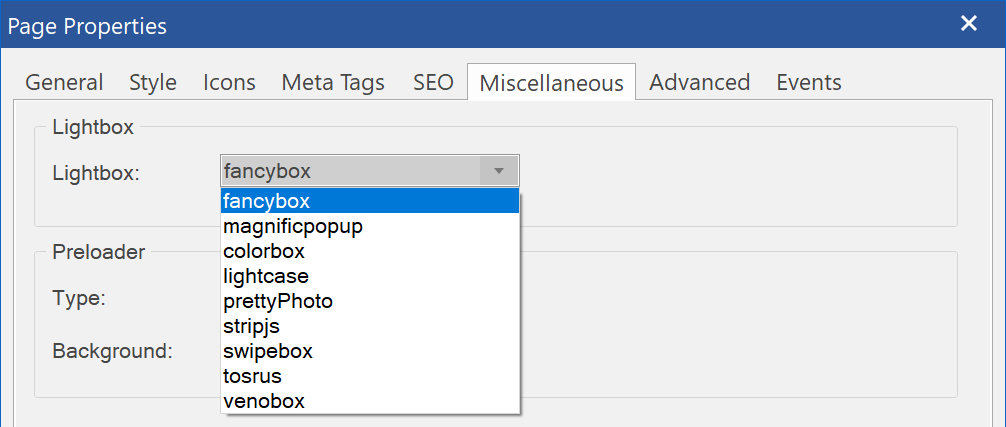
The lightbox for links can be configured in the Page Properties -> Miscellaneous. The selected lightbox will be used for all links on the current page. Note that the Page Properties only shows a subset of the installed lightbox scripts, because some scripts were designed for images only and therefor cannot be used for links.
YouTube, Vimeo, HTML5 Video
The Lightbox option in YouTube, Vimeo and HTML5 video makes it possible open the video in a lightbox after clicking on a preview image. The lightbox type can selected in the page properties (see above).
The Lightbox option in YouTube, Vimeo and HTML5 video makes it possible open the video in a lightbox after clicking on a preview image. The lightbox type can selected in the page properties (see above).

Options
To customize the behavior of the lightbox, you can add extra options through the 'Options' button. Options are separated by a comma. The possible options are different for each lightbox. Please consult the documentation or website of the specific lightbox for more details about the available options.
Example for Fancybox:
padding: 25,
overlayShow : true,
overlayColor : '#FF0000'
Examples
Here are a few demos of the supported lightboxes:
Here are a few demos of the supported lightboxes:
• BoxPlus
• ColorBox
• Cycle
• fancyBox
• FluidBox
• Galleria
• New: GLightbox
• LC Lightbox
• LightCase
• New: Litebox
• magnificPopup
• Mobile Touch Gallery
• nivo-slider
• prettyPhoto
• Pika Choose
• SlimBox
• New: Spotlight
• Strip
• SwipeBox
• Tos "R"Us
• VenoBox
• Unite Gallery
• ColorBox
• Cycle
• fancyBox
• FluidBox
• Galleria
• New: GLightbox
• LC Lightbox
• LightCase
• New: Litebox
• magnificPopup
• Mobile Touch Gallery
• nivo-slider
• prettyPhoto
• Pika Choose
• SlimBox
• New: Spotlight
• Strip
• SwipeBox
• Tos "R"Us
• VenoBox
• Unite Gallery
Adding other third party lightboxes (for advanced users)
WYSIWYG Web Buider already has support for the many popular third party lightbox scripts, but if you have found one that is not supported yet, then you can add it yourself.
lightbox add-ons are stored in C:\Program Files\WYSIWYG Web Builder 16\lightbox
To add a new lightbox, create a new folder, for example C:\Program Files\WYSIWYG Web Builder 16\lightbox\mylightbox
Place all script files in this folder.
Next, you will need to tell the software how to add the script to the page:
Create a configuration file lightbox.ini in the same folder. The content of the file should look something like this:
[copyrights]
// copyrights of the script
company=WYSIWYG Web Builder
// url of the website
url=http://www.wysiwygwebbuilder.com
[init]
// script to be place inside $(document).ready function
script=$('#$ID$').lightbox({ $SETTINGS$ });
// default settings of the script
settings=fx:'shuffle'
The following variables are available in the 'script' section:
$ID$, this will be replaced by the ID of the object
$WIDTH$, this will be replaced by the width of the object
$HEIGHT$, this will be replaced by the height of the object
$SETTINGS$, this will be replaced by the settings (either the default settings or the one configured by the user).
Please study lightbox.ini of the other lightboxes for more inspiration...
Related tutorials
Implementing a global lightbox gallery
An introduction to the Photo Gallery
An introduction to the SlideShow
An introduction to the Photo Gallery
An introduction to the SlideShow